Before you set out to make this wreath for Christmas, promise yourself that you will not step out to buy anything. Look around for what is available in your house and visualise the look and feel of the wreath you want.
Be creative. Think out of the box.
Things you will need
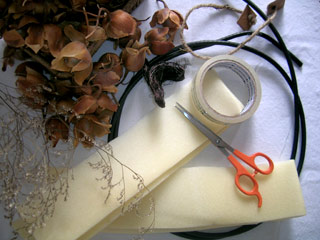
Plenty of dried flowers (you can also use newspaper bits, crushed brown paper shreds, dried leaves, dried straw bits, etc)
- Fillers – for embellishing the wreath (you can also use dried grass, twigs, dried tendrils, spaghetti, thin and slender dried leaves, any stuff from your old arrangements, etc.
- Cellophane Tape – to seal the loose ends
- Cable Wire/ Thick Wire/ Round Metal Frame – to form the basic frame of the wreath
- Thin sheet of foam which may be leftover or recycled – the add body to the wreath’s frame
- Thin metal wire – to fix the flowers around the frame. Or glue – If you do not like the idea of using a metal wire to fix the flowers
- Left over coir rope or strings – for making a loop to hang the wreath
LETS GET STARTED
Make a circle out of the old cable wire. Since it is thick and sturdy, it forms a perfect circle and because of its weight, the wreath will not fly away when hung on the door.
Seal the ends of the cable wire ring with cellophane tape, so as to prevent it from getting unwound.

Cut 2-inch wide long strips out of any waste foam sheet. Start from the top and wind it around the cable frame, spirally, completing the whole circle. Seal the foam strip ends to prevent it from unwinding.

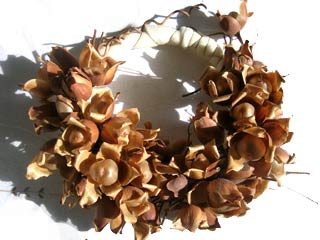
The base is now ready. Sort your dried flowers into buds and blooms. This will later help you pick up the right kind of flower you may need, as work progresses.
Start securing twigs to the wreath base. Let the natural formations and twig patterns help you decide the design. You can make a perfect circle with twigs or let the beautiful imperfections come in.

Start from the sealed spot. Pick up a single flower or a bunch of flowers and wind them around the foam padding. Use a thin metal wire as a binder and secure this first bunch firmly onto the frame.

Add another flower or set of flowers to the frame and keep securing them with the metal wire or glue. Keep working around with more flowers and secure them to the base. You may place the flowers randomly or make a full floral circle.
You will get a fair idea of the pattern as you work along. More often than not, the work in progress patterns look far better than the finished product. Be creative with the thrash you throw around while making this wreath. Broken bits of twigs and dried petals can add far more beauty and depth to this organic wonder.
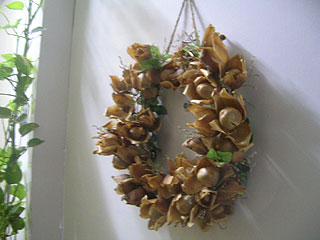
Once done, tie a coir rope or any cord to make a loop. Your basic wood rose wreath is ready to be hung on the door.
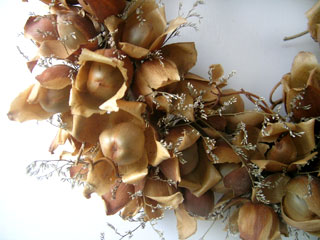
If you desire, this woodrose wreath can be further embellished with fillers. These could be dried grass, small dried flowers, etc.
Insert fillers in little gaps to form a pattern. You may insert the fillers in such a way that they are secure and wont fall off or fly away. Or simply glue them.
This eco-friendly Christmas wreath is now ready to be hung on your door.
Or you may add some candles for the added warmth at the dining table.

Have a healthy and happy Christmas.
Excellent tutorial. I must try to do something similar. All the best to you.
Very nice. Where do you get the wood roses? Thanks